|
|


|
|||||||


| التسجيل | التعليمـــات | التقويم | البحث | مشاركات اليوم | اجعل كافة الأقسام مقروءة |
| Lessons Corel Draw Lessons CorelDRAW Graphics Suite X3, Corel Draw Tutorials |
 |
|
|
LinkBack | أدوات الموضوع | انواع عرض الموضوع |
|
|
|
|||||||
| التسجيل | التعليمـــات | التقويم | البحث | مشاركات اليوم | اجعل كافة الأقسام مقروءة |
| Lessons Corel Draw Lessons CorelDRAW Graphics Suite X3, Corel Draw Tutorials |
|
|
|
LinkBack | أدوات الموضوع | انواع عرض الموضوع |
 21-Jul-2007, 06:53 AM
|
رقم المشاركة : 1 (permalink) | ||
|
Drawing Buildings in CorelDraw Exclusive Tutorial I noticed that the designers at frequently use illustrations in business templates, and decided to draw something similar of my own. I chose to create a business center as an example. Incidentally, the methods used in this tutorial are quite simple and do not require special knowledge. So let's get on with it, without trepidation, without delay. To begin we will draw three rectangles – these will be the tops of buildings seen from above. For this, use the "Rectangle Tool", which is located in the "Toolbox" panel.  For clarity and comfort paint your rectangles three different shades of grey. 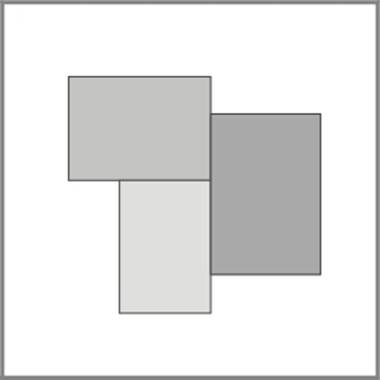 Now, select all three objects. Do this by holding the "Ctrl" key then subsequently clicking on the objects. After all items have been selected, group them using keys "Ctrl+G". This is the necessary condition for the effect "Add Perspective", which is located in the "Effects" menu. This effect is known as foreshortening, and with the help of this effect, you will be able to achieve the desired result. 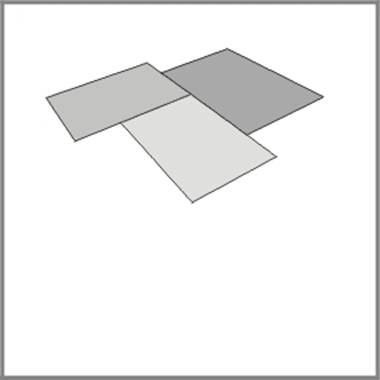 Before building the frame of your future building, group (for this use a combination of keystrokes "Ctrl+U") and place each of the rectangles – this defines the difference of the heights of the buildings. The frame of our building was created using only the "Interactive Extrude Tool", which is located in the "Toolbox" panel.  By default, in the settings for these instruments, also, is the perspective of shortening. So, choosing "Interactive Extrude Tool", click on the desired object, and holding the mouse-key, drag the cursor to the bottom. The resultant image is only part of the preparation for the final result and is not ready for use. In order to transform the unfinished object to the final product it is necessary to go to menu "Arrange" and option "Separate". Repeat this action for the remaining rectangles to get the finished frame of your building. 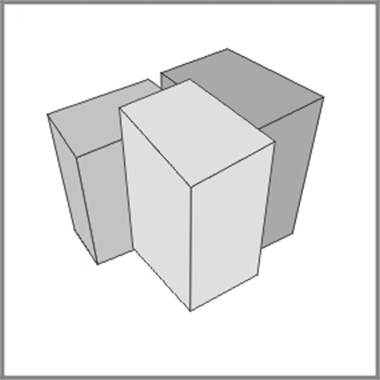 In order to begin painting, ungroup objects. 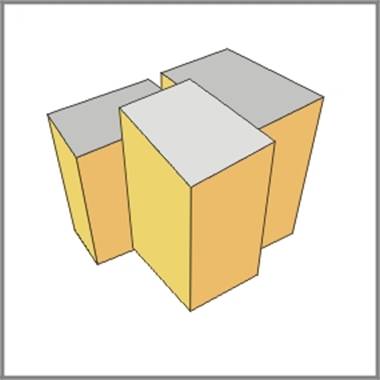 But buildings must contain windows. To avoid drawing windows one by one, draw one window and copy it as many times as necessary to create the number of windows you want to have on these buildings. 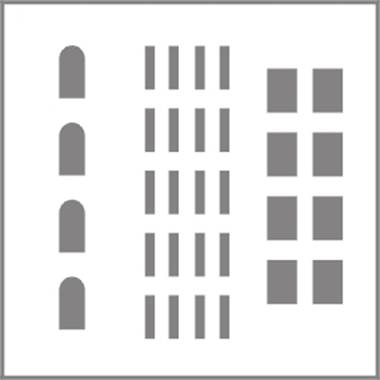 Now combine the windows into one object through a combination of keystrokes "Ctrl+L". Choose "Add Perspective" effect and use it distort the windows to fit the shape of the walls on the building. Repeat the method for each wall. 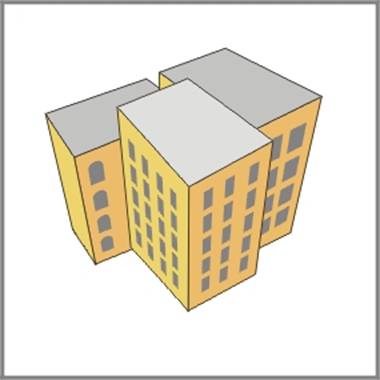 Now the buildings have windows, but the illustration doesn't appear finished. To give it the finishing touch you should create a shadow effect. Call the "Transformation" panel, which can be used to "Apply " or "Apply To Duplicate" at designated intervals. By default the object will be copied without being moved. So, select the wall and copy it without removing it and fill in with a different color (highlighting the lit sides I fill in with lighter colors, and dark sides, with dark colors). Choose "Interactive Transparency Tool".  Part of the chosen object becomes visible, and the part where the mouse button rests becomes invisible. This is how the effect of shadows on these basic buildings is achieved .  Now select all windows and using the key "F11" call the window "Fountain Fill Dialog" – with which you will fill windows with dark and light blue gradient fills.  It's possible to add several elements to the roofs. 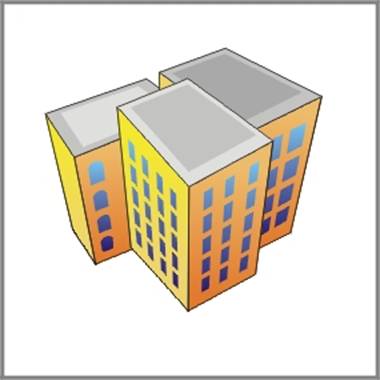 All that remains is the final touch, but it requires special attention. In the illustration the thickness of the lines determines the distance of the objects from the observer. This can be achieved in the following way: 1) select all sides of the building and using the "Outline Tool" which is located in the "Toolbox" panel give all lines the required thickness; 2) Clicking the combination or keystrokes "Ctrl+Shift+Q" transform the condition of the lines in the object; 3) deform the resultant object using the "Shape Tool", which is located in the "Toolbox" panel.  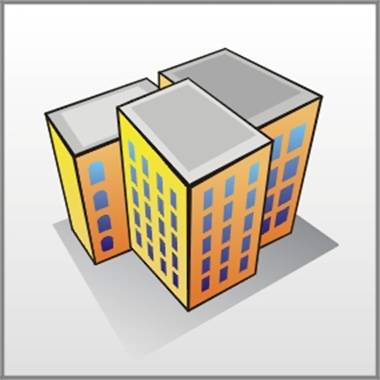 The only difficulty you can expect to encounter is that your final product may contain a huge number of dots which should be removed before changing the shape of the objects. 
|
|||

|
|
| مواقع النشر (المفضلة) |
| الذين يشاهدون محتوى الموضوع الآن : 1 ( الأعضاء 0 والزوار 1) | |
| أدوات الموضوع | |
| انواع عرض الموضوع | |
|
|
Design - Scrapbook - Photoshop - Adobe - Image - Flash - Swish - 3D - 4D - Illustrator - Corel Draw - Lessons - English - Forex - Web Links - youtube - Vectors - sms - mms - psd
برامج , العاب , صور , ازياء , برامج اون لاين , رياضة سبورت , اخبار ماكس مام , دليل المواقع : للاعلان فى موقع مدرسة التصميم
العاب بنات احدث وافضل واجدد العاب بنات هي عباره عن العاب اون لاين بمعنى اخر هي العاب فلاش تتنوع الالعاب بين العاب اكشن والعاب تلبيس وغيرها وهناك قسم العاب انجليزي اسمه Dress Up Games جميع ما تبحث عنه من العاب باللغة الانجليزية
|
|
|

 : فقط
: فقط


 لهذا الموقع الجميل


 العرض العادي


